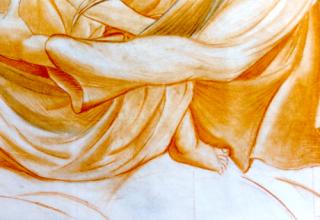
< My question is how would
< this typically be sectioned
< out or would it be painted
< in one day? Also the colors
< seem very simple, but are
< there any special tips or
< observations? You should be able to complete this copy at the size of 36x48 in a day (I would) other ways you will have to go through some elaborate cutting.
You can create the rough edge, like you wrote in the forums that should cut about 2+ sq. feet of the total footage and give you more time to work a detail and size would not look that scary.
Then if plaster is done properly and I am sure with you it will! be it should give you about 8 - 12 hours of painting time - that is plenty.
I noticed that fresco works faster for me than acrylic, can not paint over so take it slow but work exact - you know "slow and sturdy wins the race".
Prepare the full scale cartoon with shading and "everything" This will teach your hand to memorize the piece and you will gain confidence. Below is the sample of my cartoon for the Albuquerque Fresco. This sample should show how far the cartoon should be developed.
Use tracing paper for transfer nothing thicker!!! before laying tracings over get a small piece of the tracing paper about one inch square and lay it on the plaster if it will get wet or stick to the plaster - wait a few min and try again until the piece will be falling off without sucking any moisture.
Lay the pounced tracings over and dust with charcoal! not with red pigment. It is a delicate, in color, piece and red will scream out and drag no matter what!
Use wet color underpaint in terra verde, then get light umber with a bit of yellow ochre wet wet and work out slightly the columns and swags and walls.
Check the colour mixes by dipping the brush in and pulling it out - should run quick then stop and give you three last drops (i do not know which brushes you use but should work).
Squeeze the brush between fingers slightly, if not will live blotches also it is fresco - the color that is left should give you about three long strokes twenty times more that fully loaded and dripping acrylic brush.
When done take raw umber and work shadows - cold ones several times warm ones lightly. Then take a burnt umber wet and work out the flesh and warm shadows of figures and fore ground shadows (that thing on the bottom).
Then get the rosy mix wet red oxide - very little pigment and glaze the wall live the swags and that curly thingy in upper left corner along!
Get some yellow ochre may drop a bit of umber and drop of lime (white) wet, lay done some veins and stuff for marble wall, that curly thingy live along, touch the swags. Pick up the shadows here ore there with raw umber
Move to figures terra verde and a bit of yellow ochre for the jacket on the left dude red ochre on the right one wet wet get sienna wet wet and work the bottom. Touch up the shadows with raw umber and work the hair.
Now you are at the midday - thicker colors - when the brush is pulled out of the color - does not run but still will gives you three drops at the end but slow. Do not forget to squeeze the darn thing (brush). Work high lights and shirts.
Work out the people and the details with the variations of the above color, put some accents keep working until you are sick of it - at some point you will suddenly see that it miraculously started to look good - sometimes even very good! Get some detail on the swags pick up some accents on the wall
You are at the end of the day! Wet color back - glaze the whole thing with thin color. Get some thick color and pick the final detail and contrasts - "sorta" outline. Get some highlight accents with thick fat white (lime) - you are done! It will tell you when she's got enough of you.
*wet or wet wet - applies to color consistency.
Ilia Anossov
http://www.truefresco.com/workshop