"Murals on Canvas - A How-To!"
Author: Ilia Anossov
Painting murals on canvas has many advantages then painting at the location. Work at the comfort of your studio and on your own schedule, no irritated by the inconvenience or looking over your shoulder clients, just to name a few. Also mural can be taken of the wall and relocated (use to be a standard).
I use theatrical muslin - thin (helps while installing) and strong, inexpensive as well $5,00 per 108' wide. Also comes firetreated.
Staple 1mil (thin) plastic onto the wall about 1 foot larger on all foue sides than the size of the mural to paint as a membrane between the wall and canvas.
Staple canvas over plastic and prime, if you do not put the plastic then the primer (gesso) will sip through the canvas and will stick to the wall so you will have a hard time tearing it off when done.
After the mural is finished seal it with one coat of zinzer latex glaze (helps with installation, read below). Then snap chalk guide lines on the face of the mural follow the perimeter 1" bigger all around than the actual wall size and keep them vertical and horizontal (use snap line as a plumb bob). Roll the mural on the tube min 4 inch shorter than the height of the wall/mural) do net let the tube stick out - will get on the way while installing (hit the floor or ceiling).
The important thing to discuss is the installation process.
Here we go: Traditional method - first apply wallpaper glue (may need two coats) to the wall let it sit there until becomes tacky then "hang" one layer of cheese cloth, wait for an hour (until dry) apply another coat of the same glue over the cheese cloth wait until tacky (may need two coats - all surface must be tacky - sometimes first coat dries too fast - tacky in one corner and dry in the other) install your mural. Cheese cloth in-between the mural and the wall is placed for the mural to be removable (clients love it), when the mural needs to be removed just pull the mural from the corner - cheese cloth will help it separate (feels like removing masking tape). The murals in the White House are installed this way (use to be the union standard) and they have been moved around during last remodeling.
The modern method skips the cheese cloth - get a removable (did not have it in the past) wallpaper glue from the wallpaper store or wall.
Now the installation: you need a rubber wall paper roller $10 and couple of plastic wallpaper spatulas (kinda white rather thick and soft plastic) $1,50 at wall you need this to press the mural tight to the wall and push out the air bubbles - regular thing to happen, gaze coat will help you not to worry about scratching the mural with spatulas (do not use sharp edged spatulas - drywall plastic cheapies). Razor sharp utility knife - the kind you can snap the end off and off.
You will need 2-3+ people - depends on the size of the mural, When wall becomes tacky align using the vertical chalk guide line going 1-1 1/2 inch over where the edge of the mural is going to be the end of the mural (keep the mural on the roll!!) - same thing on the top and bottom of the mural - it will shrink about 1 inch on each side - more on really big murals but for those hire a mural hanging crew - there are such. Press the edge all the way down about 1- 1 1/2 feet, unroll another 2-3 feet keep this feet away from the wall, have someone hold the attached area to the wall, check the mural for the alignment (see the chalk line guides to run parallel to the floor/ceiling), press this 2-3 of the mural to the wall (use rubber roller and spatulas to run the air out), keep unrolling and pressing 2-3 feet at the time, watch not to leave air bubbles. when the whole mural is on the wall double check for bubbles - if any push them out with the spatula towards the nearest edge until gone. Wait for 20-30 min (by that time mural will shrink no more). Use the razor sharp knife, you've got to trim the edges. You are done!
Now is the best advise I have ever got on this when I started: You have to have at least one person to help - do not ask your friend to do it in exchange for dinner or other thing for the first time.
Advice - go to the paint store where you buy the glaze for example and ask the salesman for a wallpaper guy (not a company) - all wall paper guys hung murals (if not fine art then photo murals, same thing). Hire him/her to do it with you - it will cost 100-200 bucks - worth 10 fold!
The whole install should take not more than 3-4 hours.
When installed mural has the feel and look of the detailed oil painting.(with a few little tricks during the painting process)
Good Luck! Ilia Anossov fresco painter, sculptor
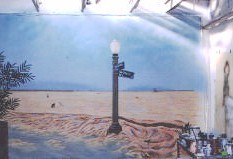
Windward Mural 14x10 ft on the studio wall
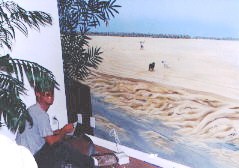
Glenn is trimming the access.
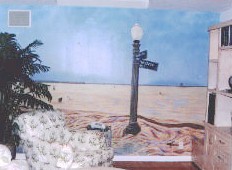
Windward Mural by Ilia Anossov - installed
_________________________________________________________________
Ilia Anossov - is a practicing fresco painter and sculptor, author of the Albuquerque Fresco (largest contemporary buon fresco in Western US - over 400 sq. feet). Ilia Anossov is a founder of an independent educational project - http://www.truefresco.com, Modern Fresco Gallery and Nationwide Fresco Painting Workshop program. Workshop locations and applications available at http://www.truefresco.com/workshop
Ilia can also be reached via email fresco@truefresco.com